A Step-by-Step Beginner’s Guide to Master Manual Mode Photography | Manual Mode Photography Tutorial | 14 Ultimate Tips and Tricks for Shooting in Manual Mode

The Eternal Challenges of a Beginner Photographer
Before we begin, let me first ask you a few fundamental questions -
Have you invested in a new expensive camera, but the output image quality is not satisfactory to you?
Are your images too bright with whitewashed/blown-out backgrounds or too dark foregrounds?
Are you not getting the artistic background blur that you have seen in the images of other photographers?
Are your images not sharp and/or shaky/blurry?
Are your images noisy/grainy?
If the answer to these questions is yes, you are at the right place. Trust me, you are not alone. We’ve all been there, done that. Your questions are the questions of the entire humankind since all eternity. And today, I’m going to help you remediate these eternal challenges of a beginner photographer!
And if you want to know the extensive list of basic camera settings that you must use to set up your camera for photography and videography, I recommend you to read our articles A Step-by-Step Beginner’s Guide to Master Basic Photography Camera Settings | Best Manual Camera Settings for Beginner Photographers and Ultimate Guide to the Best Camera Settings for Video Shooting, respectively.
“First of all, do I need a better camera?”
I’ve always been a big proponent of the age-old adage, “The best camera in the world is the one that you have; you just need to know how to use it!” As in Kung-Fu Panda, Po finally realized, “There’s no ‘Dragon Scroll’; it’s just you,” I genuinely believe it’s not the gear but the one behind the gear who makes the world look beautiful. So, you don’t need a better camera, but perhaps a better understanding of optics, your camera settings, and knowledge of how to use them in real-world situations.
“Then what’s going wrong, and what’s the remedy?”
You are facing these challenges since you are shooting in ‘Auto’ mode of your camera, and the camera is deciding the settings/parameters for taking the shot. In other words, you are just riding a wild horse that you’ve no control upon, and it’s taking you in the direction it pleases. To remediate, you need to take the reins in your hands and guide it in the right direction. That’s called “Getting out of the ‘Auto’ mode” or “Getting into the ‘Manual’ mode,” which, though sounds threatening, is more innocuous than you can imagine and, with the right guidance, is easier than you think. Today, I’m going to help you break free of the shackles of mediocrity and take a step forward towards taking mind-blowing images!
A Step-by-Step Beginner’s Guide to Manual Mode Photography
1. Shoot RAW
The first thing we need to do for shooting in manual mode is shooting in RAW format instead of JPEG format. Do that by going into your camera settings and changing the file format to ARW for Sony, NEF for Nikon, or CRW for Canon. A RAW file format is like raw vegetables. It has all the ingredients (light and shadow information) needed to cook a good image. So you must shoot in RAW, then open the RAW files in a basic RAW processing tool like Adobe Camera RAW or Adobe Lightroom and then use the available information in the image to cook the food as per your wish. Once cooking is complete, you can then serve it on the platter (save in JPEG format). On the other hand, a straight-out-of-the-camera JPEG file is like already cooked food. It is impossible to do much with it apart from adding some sauce or sprinkling salt (adjusting a little brightness or contrast). So shoot RAW always.
Note: Sometimes, Adobe Camera RAW or Adobe Lightroom may not recognize the RAW image’s file format coming out of your camera. E.g., Adobe Camera RAW 9.1.1 (that comes as a plugin with Photoshop CS6) cannot identify the ARW file format from Sony. There’s nothing to worry about. There is a freely downloadable software called Adobe DNG Converter that can convert your RAW file to a universally readable RAW file format DNG (Digital Negative) with a single click while preserving all the details in your original RAW file. To know more about the Adobe DNG Converter or download it, please read the article Our Post-Processing Tools.
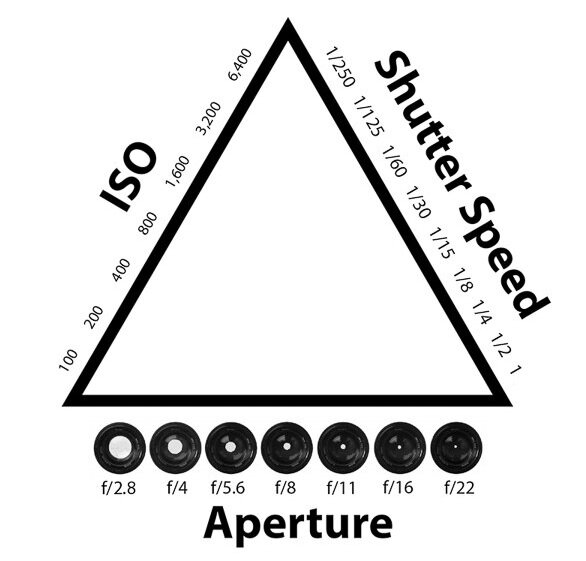
2. Understand the ‘Exposure Triangle’
Before we get into how to stop shooting in ‘Auto’ mode of your camera and start shooting in ‘Manual’ mode, let’s begin with understanding a few basics of optics. First, let’s understand the most important concept of photography - the ‘Exposure Triangle’ and how to control that using your camera settings. ‘Exposure Traingle’ is a term given to the three parameters that collectively determine the optimal exposure or, in other words, the right amount of brightness in your image. These three factors are Aperture (A), Shutter Speed (S), and ISO, which you may have seen mentioned in the EXIF info (settings that were used to take the shot) below an image. They are depicted as three sides of a triangle, since like in a triangle if you change the length of one of the sides, the length of the other two sides need to be adjusted to complete the triangle, similarly if one of these parameters change, we need to compensate by adjusting the other two parameters to obtain an optimal exposure.
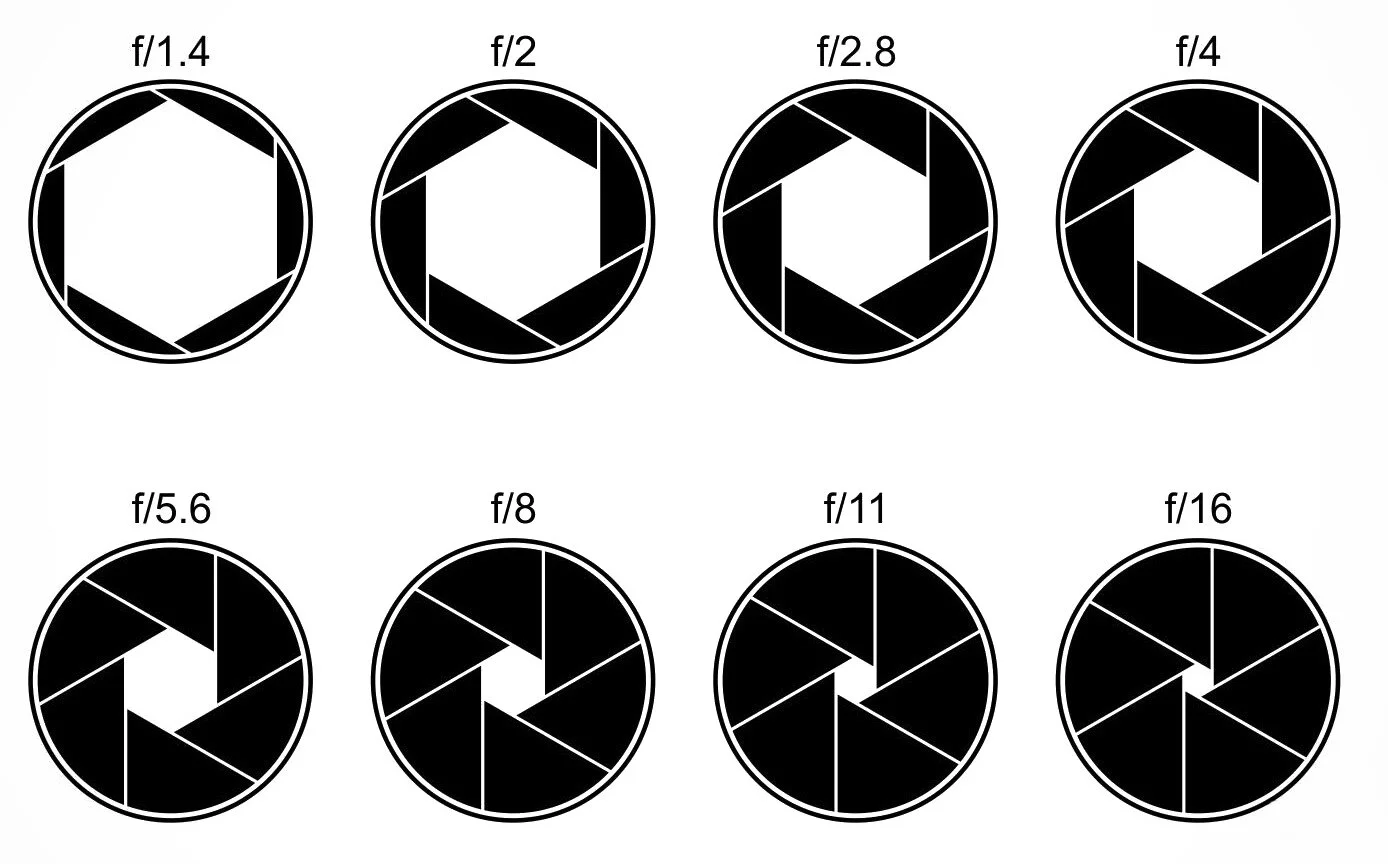
3. Choose the right Aperture (F-Number) to control the ‘Depth of Field (DOF)’
The aperture is the small hole in the lens through which the light enters. It is represented by an F-number that indicates how much light the lens lets through to the sensor. Every time you increase or decrease the aperture by changing the F-number, the light entering the camera will increase or decrease by ‘1 F-Stop’ commonly just called ‘1 Stop',’ a jargon used by the photography industry to describe the amount of light entering the camera. Remember, the smaller the F-number, the larger is the aperture, and the lesser is the depth of field, which means only the focal plane (the plane where you’ve focused) will appear sharp, and the background will be blurred, which is also known as bokeh. And the larger the F-number, the smaller is the aperture, and the greater is the depth of field, which means the whole frame (from foreground to background) will appear sharp.
Note: 1 F-Stop equals 1 EV (Exposure Value), which I will explain later in this article under ‘Exposure Compensation.’
So, if you are trying to take a portrait, still life, or macro shot and want the aesthetic background blur you’ve always seen in similar images of other photographers, notch down the aperture to the smallest F-number possible (meaning the largest aperture) like F1.8 or F3.5. Alternatively, if you are trying a landscape shot and want the whole frame to be in focus, try a bigger F-number (meaning smaller aperture) between F9 and F14. And if you want a starburst effect (the street lights appearing as stars), go for even smaller apertures like F16 or F18.
Note: But remember, for every lens, the sharpness of the images rises from the biggest aperture (lowest F-number), peaks somewhere between F9 and F11, and then gradually diminishes due to an optical phenomenon called diffraction (bending of light rays around sharp corners). So at the smallest aperture like F22, when the shutter blades close in front of the small hole, you may get a good starburst, but you will get a softer image due to the light loss owing to diffraction. So don’t use such a small aperture unless needed (for long exposure, for instance), as you can get a pretty good starburst effect with a sharp image even at F16. To know more about long exposure photography, please read our article A Step-by-Step Beginner’s Guide to Master Long Exposure Photography | Long Exposure Photography Tutorial | 30 Ultimate Tips and Tricks for Long Exposure Photography.
For this image, I used a large aperture to obtain low depth of field (EXIF: A - F3.5, S - 1/800 seconds, ISO - 100)
For this image, I used a small aperture to obtain high depth of field (EXIF: A - F11, S - 1/250 seconds, ISO - 100)
For this image, I used an even smaller aperture to get the starburst effect (EXIF: A - F18, S - 180 seconds, ISO - 100)
4. Choose the right Shutter Speed to obtain ‘Optimum Exposure’ or ‘Freeze Motion’
The shutter speed is the speed with which the shutter closes to capture the image. In other words, it determines for how long the sensor is exposed to the light entering the camera through the aperture of the lens. The faster the shutter speed, the darker and crisper the image with all motion frozen, and the slower the shutter speed, the brighter the image and more motion blur is captured. This also means that for slower shutter speeds, even a minute vibration of your hand will lead to blurry images, and hence for low shutter speed conditions, a tripod is customary. Slow shutter speeds are desired when you want to capture the motion of the clouds or waterfalls, known as long exposure photography. To know more about long exposure photography, please read our article A Step-by-Step Beginner’s Guide to Master Long Exposure Photography | Long Exposure Photography Tutorial | 30 Ultimate Tips and Tricks for Long Exposure Photography. Other than that, under normal handheld shooting circumstances, a fast shutter speed is desired.
For beginners, as a rule-of-thumb, set a shutter speed to the reciprocal of the maximum focal length of your lens, to begin with. That means, if you are using an 18-200 mm lens, use a shutter speed of 1/200, to begin with, and then adjust the speed based on the brightness or darkness of the output image. If the image is too bright, increase the shutter speed to expose the sensor to the light for less time to make the image darker (to 1/300 seconds, for instance), or if the image is too dark, decrease the shutter speed to expose the sensor to the light for more time to make the image brighter (to 1/100 seconds, for instance). During the initial days of your learning curve, it will be a trial and error. But with experience, you will just know what shutter speed to use under what conditions. But don’t worry, I will give you a cheat for that too. Wait for it!
For this image, I used fast shutter speed to freeze the motion of the birds (EXIF: A - F9, S - 1/800 seconds, ISO - 100)
For this image, I used slow shutter speed to capture the motion of the clouds and the water (EXIF: A - F9, S - 40 seconds, ISO - 100, ND filter - 10 Stop)
5. Choose the right ISO to control the ‘Light Sensitivity’
ISO represents your camera’s sensitivity to light with lower values corresponding to lower sensitivity and higher values corresponding to higher sensitivity. In other words, in low-light handheld shooting situations, if you observe the camera is slowing down the shutter speed to let in more light to compensate for the low light condition, and you’ve started getting blurry images due to hand vibrations, you need to notch up the ISO value of your camera to make it more sensitive to low light. This will increase the shutter speed and help you shoot a handheld optimally exposed image without hand vibrations. But please bear in mind that the camera does this by artificially illuminating the sensor’s pixels, and hence they appear in the image as noise/grains. So unless extremely necessary (like for low-light handheld situations), I recommend against increasing the ISO. It is best to have a tripod in a low light condition so that you don’t need to care about hand vibrations and hence don’t need to notch up the ISO. For all other normal light situations, always keep the ISO to the lowest value (ISO 50 or ISO 100, whichever is the lowest in your camera).
Note: The noise can later be reduced in post-processing applications like Adobe Lightroom, Adobe Camera RAW, Dfine (Nik Collection Tool), DXO PhotoLab, Skylum Luminar, or Topaz Labs DeNoise AI, but in most cases, it does it at the cost of compromising with image sharpness and details. So it is best to try not to introduce noise in the image in the first place. To know how to perform noise reduction in post-processing, please read my article My Step-By-Step Photo Post-Processing Workflow | A Beginner’s Guide to RAW Photo Editing | Adobe Lightroom, Photoshop, and Nik Collection Tutorial.
For this image, I used high ISO for shooting in extremely dark situation handheld which introduced noise that I later reduced using Adobe Lightroom but it compromised the sharpness of the image (EXIF: A - F7, S - 1/20 seconds, ISO - 6000)
6. Choose the right Priority Mode - Aperture Priority (A), Shutter Priority (S), or Manual Priority (M)
Now that you are cognizant of the ‘Exposure Triangle,’ it is time to think of which ‘Priority Mode’ to use for setting up the three parameters of the ‘Exposure Triangle,’ namely the aperture, shutter speed, and the ISO. Every camera has a full manual mode named the ‘Manual Priority’ mode and two semi-manual modes, namely the ‘Aperture Priority (A)’ and ‘Shutter Priority (S)’ Modes. I will now tell you what these are and when to use which Priority Mode.
The ‘Manual Priority (M)’ mode - In this mode, you control all the three parameters of the ‘Exposure Triangle,’ namely aperture, shutter speed, and ISO. However, I strongly opine that this mode is not needed for most photographers for 95% of the situations barring 5% of the situations like long exposure, sports, action, or wildlife photography, where getting control on both the aperture and shutter speed becomes necessary. To know more about long exposure photography, please read our article A Step-by-Step Beginner’s Guide to Master Long Exposure Photography | Long Exposure Photography Tutorial | 30 Ultimate Tips and Tricks for Long Exposure Photography.
The ‘Aperture Priority (A)’ mode - In this mode, you control the aperture and the ISO, and the camera adjusts the shutter speed to get an optimal exposure. I recommend using this mode 95% of the time as you get to control the depth of the field using the aperture.
The ‘Shutter Priority (S)’ mode - In this mode, you control the shutter speed and the ISO, and the camera adjusts the aperture to get an optimal exposure. I recommend almost never using this mode since losing control of the aperture will result in losing control of the depth of field, which is something that you don’t want. Some sports, action, and wildlife photographers sometimes prefer to use this mode, since to them, getting a tack-sharp image of the frozen motion of a player or an animal is more important than the depth of field or the bokeh (background blur). However, I still don’t think this is needed. In such situations, you have 2 options -
If it’s a well-lit situation - Shoot in ‘Aperture Priority (A)’ mode, set the aperture you wish, set the ISO as ‘Auto-ISO,’ and the camera will then take care of both the shutter speed and ISO to give you optimum exposure and frozen motion.
If it’s a low-light situation (like shooting a bowling match in a dark bowling alley) - The above may not work since the camera may still try to go for lower shutter speeds to allow more light to enter the camera to compensate for the low light. In that case, shoot in ‘Manual Priority (M)’ mode, and take full control of the Aperture, Shutter Speed and ISO to get the image you want.
So I will recommend you to use ‘Aperture Priority (A)’ mode for 95% of the situations, ‘Manual Priority (M)’ mode for 5% of those special situations like long exposure, sports, action, or wildlife photography, never use ‘Shutter Priority (S)’ mode, and leave the ‘Auto’ mode for your kid to play around with.
Also, I would advise you against using the ‘Scene’ modes found on your Priority Mode dial, such as Macro, Sports, Fireworks, etc. for a variety of reasons. The primary cause is that these settings differ significantly not only between different camera manufacturers but also between models. You might not be able to find the same scene mode on a different camera model if you grow accustomed to using a certain scene mode on one camera and then decide to upgrade to a new one in the future. Also, using these scenes, the ‘Exposure Triangle’ will be automatically decided by the built-in presets for each of these modes and you will not have complete control over them. So technically these ‘Scene’ modes are a stepping stone between the ‘Auto’ mode and the ‘Priority’ Modes. I recommend that you take maximum control over the ‘Exposure Triangle’ using the ‘Aperture Priority’ or ‘Manual Priority’ mode and stay away from the ‘Scene’ modes.
7. Cheat ‘Manual Priority (M)’ mode by manipulating Shutter Speed in ‘Aperture Priority (A)’ mode itself using ‘Exposure Compensation’
Now I will tell you a little secret. Apart from long exposure photography, you may actually never need to get into ‘Manual Priority (M),’ even when you need to control the shutter speed like in sports, action, or wildlife photography as I mentioned above. How to do it? By using a setting called ‘Exposure Compensation.’
What is Exposure Compensation?
Exposure Compensation is a way of asking the camera to make the image underexposed (darker) or overexposed (brighter). In Sony and Canon cameras, you have a dial for that, and in Nikon cameras, you have an EV (Exposure Value) button to set the Exposure Compensation. A positive value represents overexposure, and a negative value represents underexposure. You can change the Exposure Compensation in increments or decrements of 0.3 EV (Exposure Value), where 1 EV equals 1 F-Stop of light. The image below shows the Exposure Compensation meter with increments/decrements of 0.3 EV i.e., -3 EV, -2.7 EV, -2.3 EV, -2 EV, -1.7 EV, -1.3 EV, -1 EV, -0.7 EV, -0.3 EV, 0 EV, +0.3 EV, +0.7 EV, +1 EV, +1.3 EV, +1.7 EV, +2 EV, +2.3 EV, +2.7 EV, +3 EV.
So, when you increase or decrease the Exposure Compensation by +1 EV or -1 EV, the light entering the camera is increased or decreased by 1 F-Stop, respectively. Likewise, when you increase or decrease the Exposure Compensation by +0.3 EV or -0.3 EV, the light entering the camera is increased or decreased by 1/3rd of an F-Stop, respectively.

What does the camera do to make the image underexposed (darker) or overexposed (brighter)?
If you are in ‘Aperture Priority (A)’ mode and choose a negative Exposure Compensation value like -1 EV - The camera keeps the aperture constant and increases the shutter speed to allow lesser light to enter the sensor. This also thereby enables you to freeze motion for sports, action, or wildlife situations without pumping up the ISO and introducing grains in the image or having to go into the ‘Manual Priority (M)’ mode. This is what I do for 99% of the situations.
If you are in ‘Shutter Priority (S)’ mode and choose a negative Exposure Compensation value like -1 EV - The camera keeps the shutter speed constant and decreases the aperture to allow lesser light to enter the sensor. This alters the depth of field, and hence I recommend against using the ‘Shutter Priority (S)’ completely.
So you realize that by adjusting the Exposure Compensation while shooting in Aperture Priority (A) mode, you are indirectly adjusting the shutter speed. If you do this, you don’t need to manually set the shutter speed by going into ‘Manual Priority (M)’ mode. You just start from an Exposure Compensation value (e.g., -1 EV) and then adjust the Exposure Compensation (and hence indirectly the shutter speed) based on the brightness or darkness of the output image. If the image is too bright, decrease the Exposure Compensation by one step to -1.3 EV to make the image darker, or if the image is too dark, increase the Exposure Compensation by one step to -0.7 EV to make the image brighter and so forth. So now you know the biggest cheat of your lifetime!
8. Always underexpose a little (‘Expose for the Highlights’) to avoid whitewashed/blown-out backgrounds/skies
So far, you learnt that you need to always shoot in ‘Aperture Priority (A)’ mode (barring long exposures) to control the aperture and manipulate the shutter speed by controlling the Exposure Compensation in special situations like sports, action, or wildlife, where you need to freeze motion. Now I will tell you to always notch down the Exposure Compensation a little even if there’s no motion to freeze. In other words, I’m telling you to always shoot with an Exposure Compensation between -0.7 to -1.3. Why? Remember when I asked you the question, “Are your images too bright with whitewashed/blown-out backgrounds” your answer was “Yes?” This’s the tip to mitigate that.
So expose for the highlights instead of exposing for the shadows. In other words, notch down the Exposure Compensation (underexpose) up to the level that the details in the highlights (brighter areas like the sky) are preserved instead of overexposing to preserve the details in the shadows (darker areas like the foreground). In the process, if the foreground becomes too dark later, you can expose it later in post-processing by increasing the exposure and reduce the glare by reducing the highlights. However, this will work only if you shoot RAW since, as I said earlier, a JPEG file doesn’t have enough light information to play with like this. Please refer to the images below. If I had not underexposed, I would have got a brighter foreground but would have surely blown out the sky. I got brighter foreground anyway by exposing optimally in post-processing. So this is a life hack. Always underexpose!
If you want to know how to expose the images optimally in post-processing as I did in the image below, please read my article My Step-By-Step Photo Post-Processing Workflow | A Beginner’s Guide to RAW Photo Editing | Adobe Lightroom, Photoshop, and Nik Collection Tutorial.
9. Always check the histogram
Always check your histogram and try to expose the image optimally. If you don’t know how to read a histogram, here’s how. An image records luminous information in 3 tones - ‘Highlights’ (the brightest areas), ‘Shadows’ (the darkest areas), and ‘Midtones’ (between brightest and darkest areas). A histogram, which is in the form of a bell curve, shows these 3 tonal values in the image. The histogram’s left shows the amount of shadows, the right of the histogram shows the amount of highlights, and the middle shows the amount of midtones present in the image. A bell curve overshooting on the left means clipped shadows. One overshooting on the right means blown-out highlights. And one towards the center shows optimal exposure. Please find the images below to see underexposed, overexposed, and optimally exposed images.
Underexposed image with shadows clipped and histogram overshooting the left side
Overexposed image with highlights blown out and histogram overshooting the right side
Optimally-exposed image with bell curve towards the center
So all you need to do is ensure that the bell curve stays towards the center. And if due to difficult conditions (like this one) you cannot do that, ensure that the curve does not overshoot the right side of the graph by underexposing the image by a couple of notches. If it overshoots a bit on the left side of the graph (which means the shadows are clipped a bit), that is okay. Blown-out highlights (details lost in the sky) are worse than some details lost in the darkest shadow areas.
10. Shoot in ‘Continuous AF’ combined with ‘Burst Mode’ for moving subjects
When you are taking a picture of a still object, you should normally use ‘Single-shot AF,’ (or simply ‘AF-S’) with Focus Area ‘Flexible Spot/Expand Spot,’ whereas if the object you are photographing is moving continuously like sports, action, or wildlife, or even babies or pets, you should switch to ‘Continuous AF,’ (or simply ‘AF-C’) with Focus Area ‘Wide,’ because you want your camera to actively track your subject over a wider area. Alternatively, you could select Focus Area ‘Tracking: Flexible Spot’ in conjunction with ‘AF-C,’ and then press the focus button to lock the focus on the subject that the camera would then track.
In some of the latest cameras, there are ways to track a moving subject without even going to AF-C mode. If you have set up a custom button with the functionality of ‘Tracking On + AF On,’ you can use it to start tracking a moving subject even when you are in AF-S mode. Alternatively, if you have a touch screen, you have to enable touch tracking in the settings, and then by simply tapping on the subject on the LCD monitor, you can track the subject even when you are in AF-S mode. To know more on how to set up a custom button with ‘Tracking On + AF On’ functionality or enable touch tracking, please read our article A Step-by-Step Beginner’s Guide to Master Basic Photography Camera Settings | Best Manual Camera Settings for Beginner Photographers.
Along with that, use a fast shutter speed and shoot in ‘Burst Mode,’ which enables the camera to fire multiple shots (as long as you click and hold the shutter button) instead of just one shot. To enable burst mode in your camera, go to your camera settings and select ‘Continuous High (CH or high-speed burst mode)’ as ‘Drive Mode’ for Sony or ‘Release Mode’ for Nikon.
Burst mode ensures that the motion is frozen further and no moment is missed. This has a couple of benefits. Firstly, when you come back home, you can choose which one to keep, e.g., in the image below, I took a 10-shot burst of the flying birds and kept the one that had the diagonal formation. I could have never achieved this with a single shot.
Secondly, you can choose to merge moments from different images to create a composite image. Check out the images below where I have merged the leaves from multiple images (from a single burst) to create single composite images.
In fact, you can use burst mode even for non-moving subjects to compensate for hand vibrations. What I mean to say is that it is always better to take 3 or 4 shots than just one shot to ensure that at least one of them comes out sharp, even if there is a minor shake induced by your hand. As per my experience, I have observed that if you take a burst of 3 shots, usually the second shot comes out the sharpest, as the first shot is impacted by the vibration of your finger pressing the shutter button, and the third shot is impacted by the vibration of your finger releasing the shutter button. Therefore, shooting in burst mode can drastically improve the sharpness of your output images. So you learnt another life hack today!
11. Apply Rules of Composition
I would like to recommend a couple of fundamental composition rules to you as a starter.
Rule of Thirds (for Composition)
The ‘Rule of Thirds’ states that first, you need to imagine the frame as a grid of 3 columns and 3 rows. Then while you compose an image, you need to decide if it will be a background-major image or a foreground-major image. In other words, you need to decide who is the hero of the image - the background or the foreground. If it is the foreground like in the image below, you need to ensure that the foreground occupies roughly 2/3rd of the frame and the background (e.g., the sky) occupies 1/3rd of the frame. On the contrary, if the hero of the image is the background, you need to ensure that the background occupies roughly 2/3rd of the frame, and the foreground occupies 1/3rd of the frame.
The ‘Rule of Thirds’ also states that the main subject in the scene should be placed along the gridlines or at the intersections where the lines meet, which are called golden points. To help you determine how much is 2/3rd or 1/3rd or where are the golden points, you can switch on the gridlines of your camera, which I personally don’t do as it distracts me from the scene. But for beginners, it can be a good starting point.
In the image below, you can see that the horizon is exactly set at 1/3rd of the frame, and the lighthouse (the main subject) is placed along the grid lines, with the base of the lighthouse at the intersection of the gridlines (golden point). According to the rule, this kind of composition is the most appealing to the viewers.
Exceptions to the rule: Please remember, photography is all about perspective and not about confining yourself to the boundaries of the rules. So while the rules are there to get you started, there will be situations where you will have to override the rules, such as the one below where I put the horizon somewhere in the middle to capture both the motion of the clouds in the sky and the reflection on the water.
Leading Lines
The composition rule of ‘Leading Lines’ tells us to use lines to draw the viewer's eye towards a specific point of interest. Check out the image below where I’ve used the stairs or the tram tracks as the leading lines to lead the viewer along with them.
12. Apply Rule of Focus (Another ‘Rule of Thirds’)
Just like the ‘Rule of Thirds’ for the composition, there’s a ‘Rule of Thirds’ for the focus. It states that you must focus at a point 1/3rd from the bottom of the frame to lead the viewer from the foreground to the background. In the image below, I focused on the rocks somewhere 1/3rd from the bottom of the frame so that the sharpness diminishes gradually from the foreground towards the background.
Exception to the rule: However, again, this may not always work as at 1/3rd from the bottom of the frame, you may not have a well-lit object for the camera to focus on, or you may not even have an object at all (e.g., if the bottom 1/3rd of your frame is a mirror reflection in a water body). In such situations, I would advise you to use infinity focus (i.e., focus on some far-off object near the horizon) or focus on a foreground or a background object that is well lit. E.g., In the image below, following the 1/3rd rule, I should have focused on the pier, but since it was not well lit, I focused on the windmill, which was lit by the light of the setting sun.
13. Shoot during Golden or Blue Hour
Finally, I would like to say that your photography will dramatically improve if you start shooting during the golden or the blue hour. If you don’t know what golden and blue hours mean, let me explain them to you. They are part of the twilight. Until half an hour before sunrise and from half an hour after sunset starts the blue hour, and from half an hour before sunrise until half an hour after sunset is the golden hour. During these times, you will get images that you will never be able to get if you shoot during the daytime.
Refer to the images below to distinguish between the golden and blue hours. The images below are shot in the same location, the first one during the golden hour and the second one during the blue hour.
14. Process the images to extract the most out of the light information in the RAW files
Once you have captured mind-blowing RAW images in Manual Mode, you need to learn how to make the most out of your images through post-processing. For that, I recommend you to read my article My Step-By-Step Photo Post-Processing Workflow | A Beginner’s Guide to RAW Photo Editing | Adobe Lightroom, Photoshop, and Nik Collection Tutorial.
Epilogue
So that was the step-by-step beginner’s guide to master photographing in manual mode. Please let us know in the comments below if you enjoyed reading this article and if it helped in some way in your photography journey.
There is another great website from my friend Stacy Witten named lensespro.org that I recommend you to check out for more tips on photography and lens-buying guides for the most popular cameras in the world.
If you want to know the extensive list of basic camera settings that you must use to set up your camera for photography and videography, I recommend you to read our articles A Step-by-Step Beginner’s Guide to Master Basic Photography Camera Settings | Best Manual Camera Settings for Beginner Photographers and Ultimate Guide to the Best Camera Settings for Video Shooting, respectively. And when you’re done mastering the manual mode photography, I recommend you to move on to long exposure photography, which will do miracles to your photography. To know more about long exposure photography, please read our article A Step-by-Step Beginner’s Guide to Master Long Exposure Photography | Long Exposure Photography Tutorial | 30 Ultimate Tips and Tricks for Long Exposure Photography. Until then, merry traveling and happy shooting!
Pin the article
Bookmark the article for reading later!
Want to license/buy photos in the article?
License photos for commercial/editorial use or buy photo prints!
Want us to write an article for you?
Articles for magazines, newspapers, and websites!
Watch our Videos
Check out our videos on our Youtube Channel!
Join the Newsletter
Get updates on our latest articles!
We respect your privacy. Read our policy here.